What tool do you think of when you want to push pixels around? Most folks would go straight for Liquify and its blendy goodness, but allow me to show you a few tricks with the Warp tool that just might change your go-to choice!
Warp works directly in the layer stack whereas Liquify opens a dedicated work space. When working with layers directly you can more easily move things around or change visibility of other layers. It’s sometimes a challenge with Liquify to ensure you’re seeing and working on the correct content. Another difference with the Warp tool is that it uses control points and nodes for more precise control.
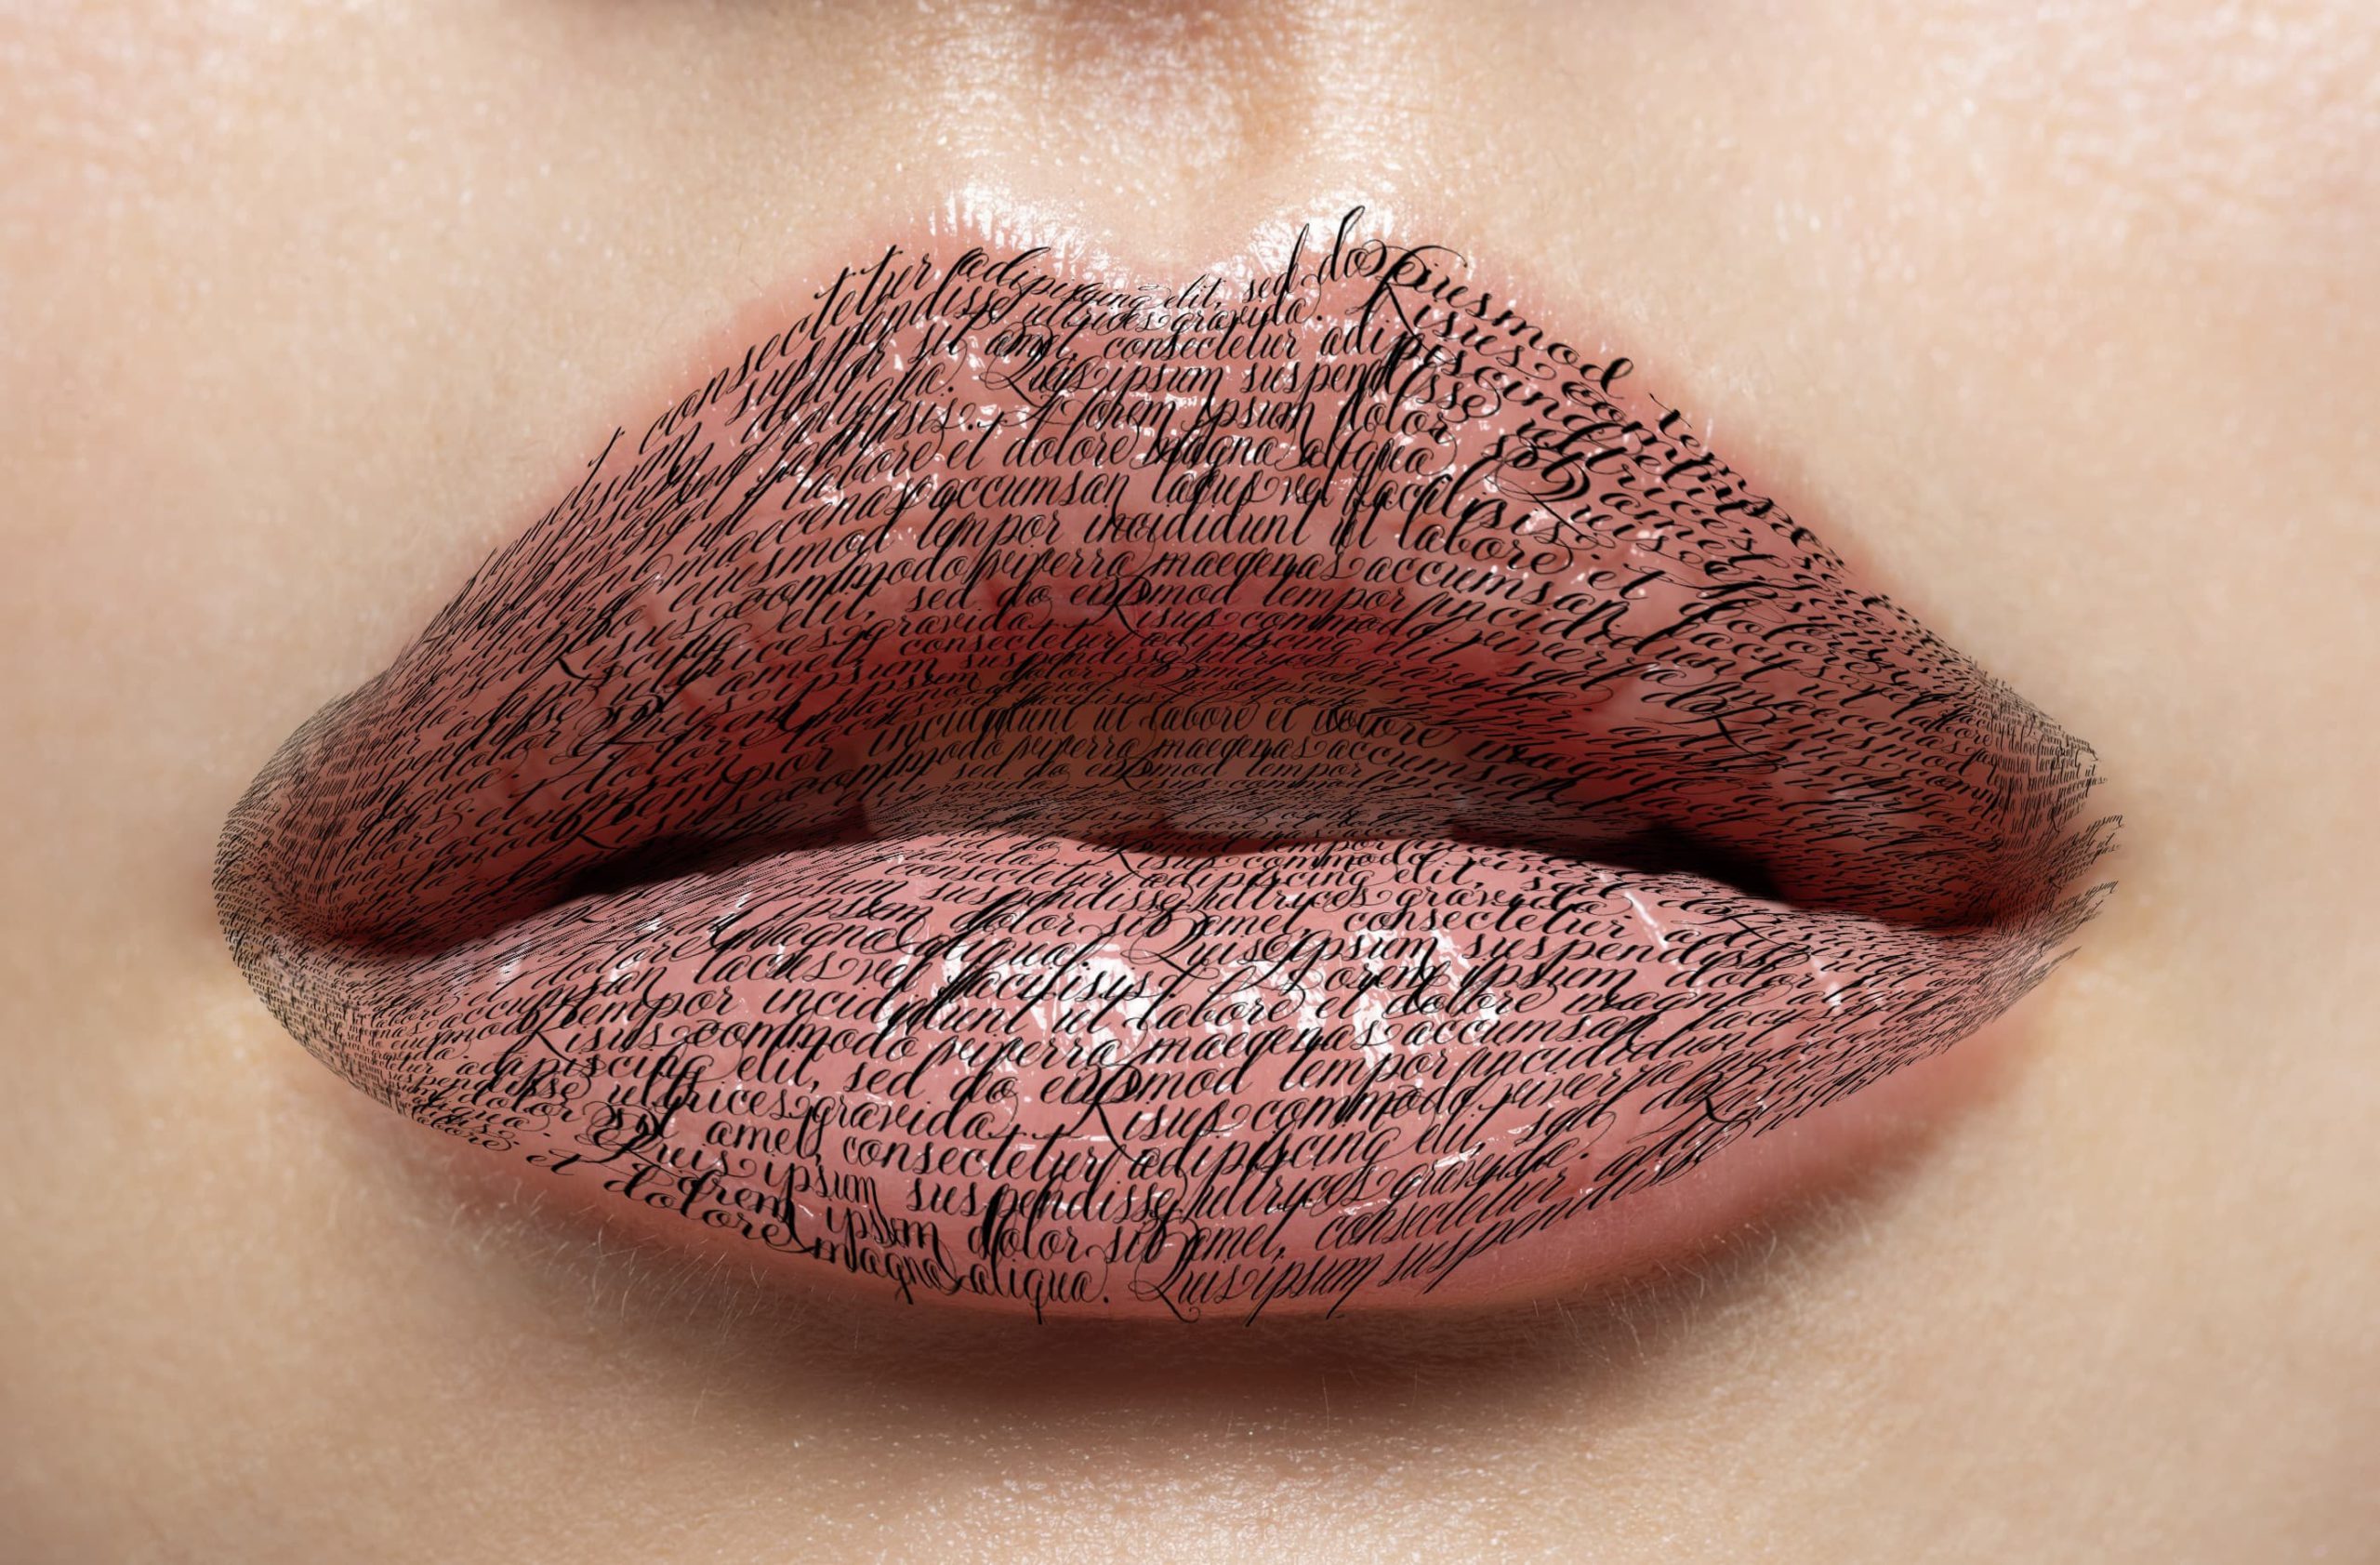
I’ve been exploring type added to photographic surfaces lately, and Warp allows me to be more precise in my placement without being constrained by simple flat transforms or creating 3D surfaces. It also works with Smart Objects, even though the transform does not show up as a Smart Filter in the layers panel.
Let’s use Warp to create a text-based texture.
…would that be a “text-ure”? No? Good thing I’m not paid to write comedy -s
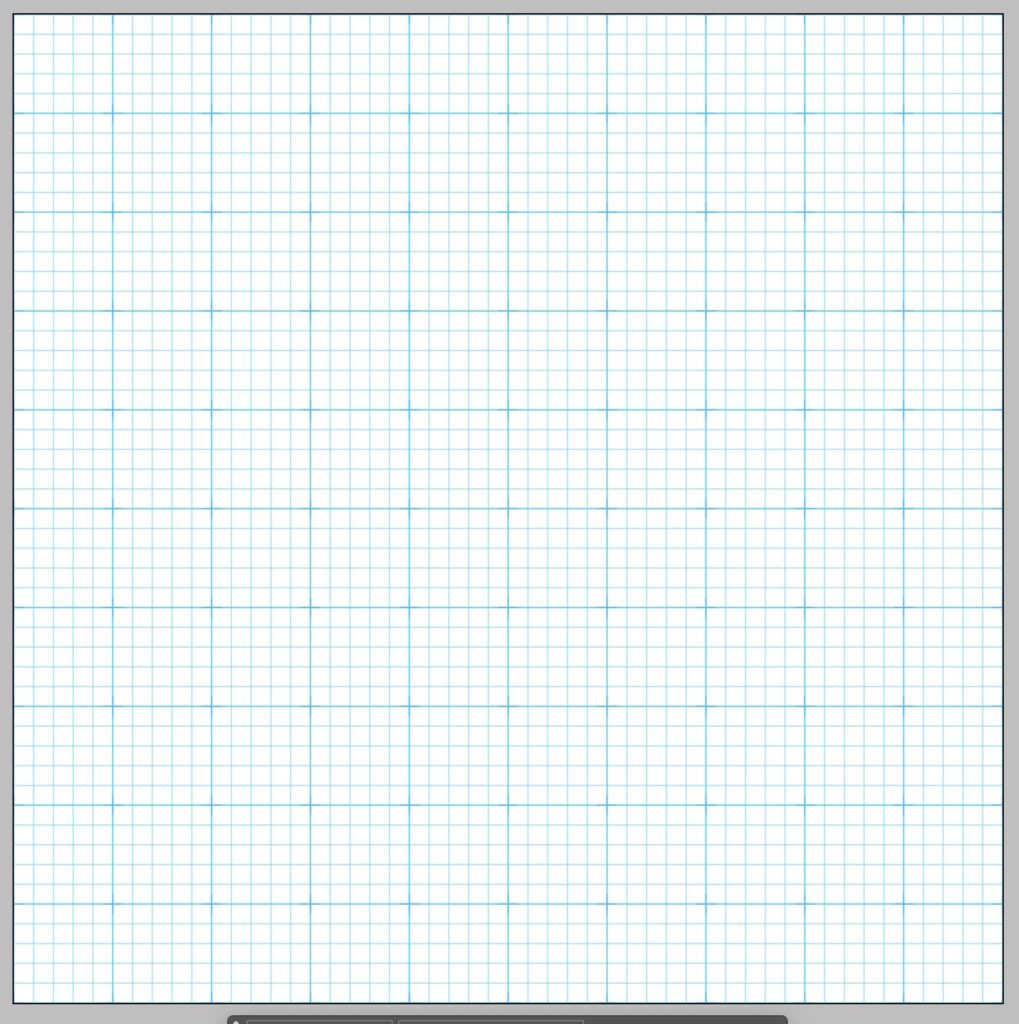
Using Warp, just like Liquify, relies heavily on ‘feel’ while you’re working. To get the most out of this month’s column I highly recommend that you get a stock image or two of plain graph paper or other regular pattern to experiment with. This will help you see the results of changes more easily than a photograph or other illustration. I’m using an image from Adobe Stock.
Adobe Stock: piai
Adobe Stock: deniskomarov
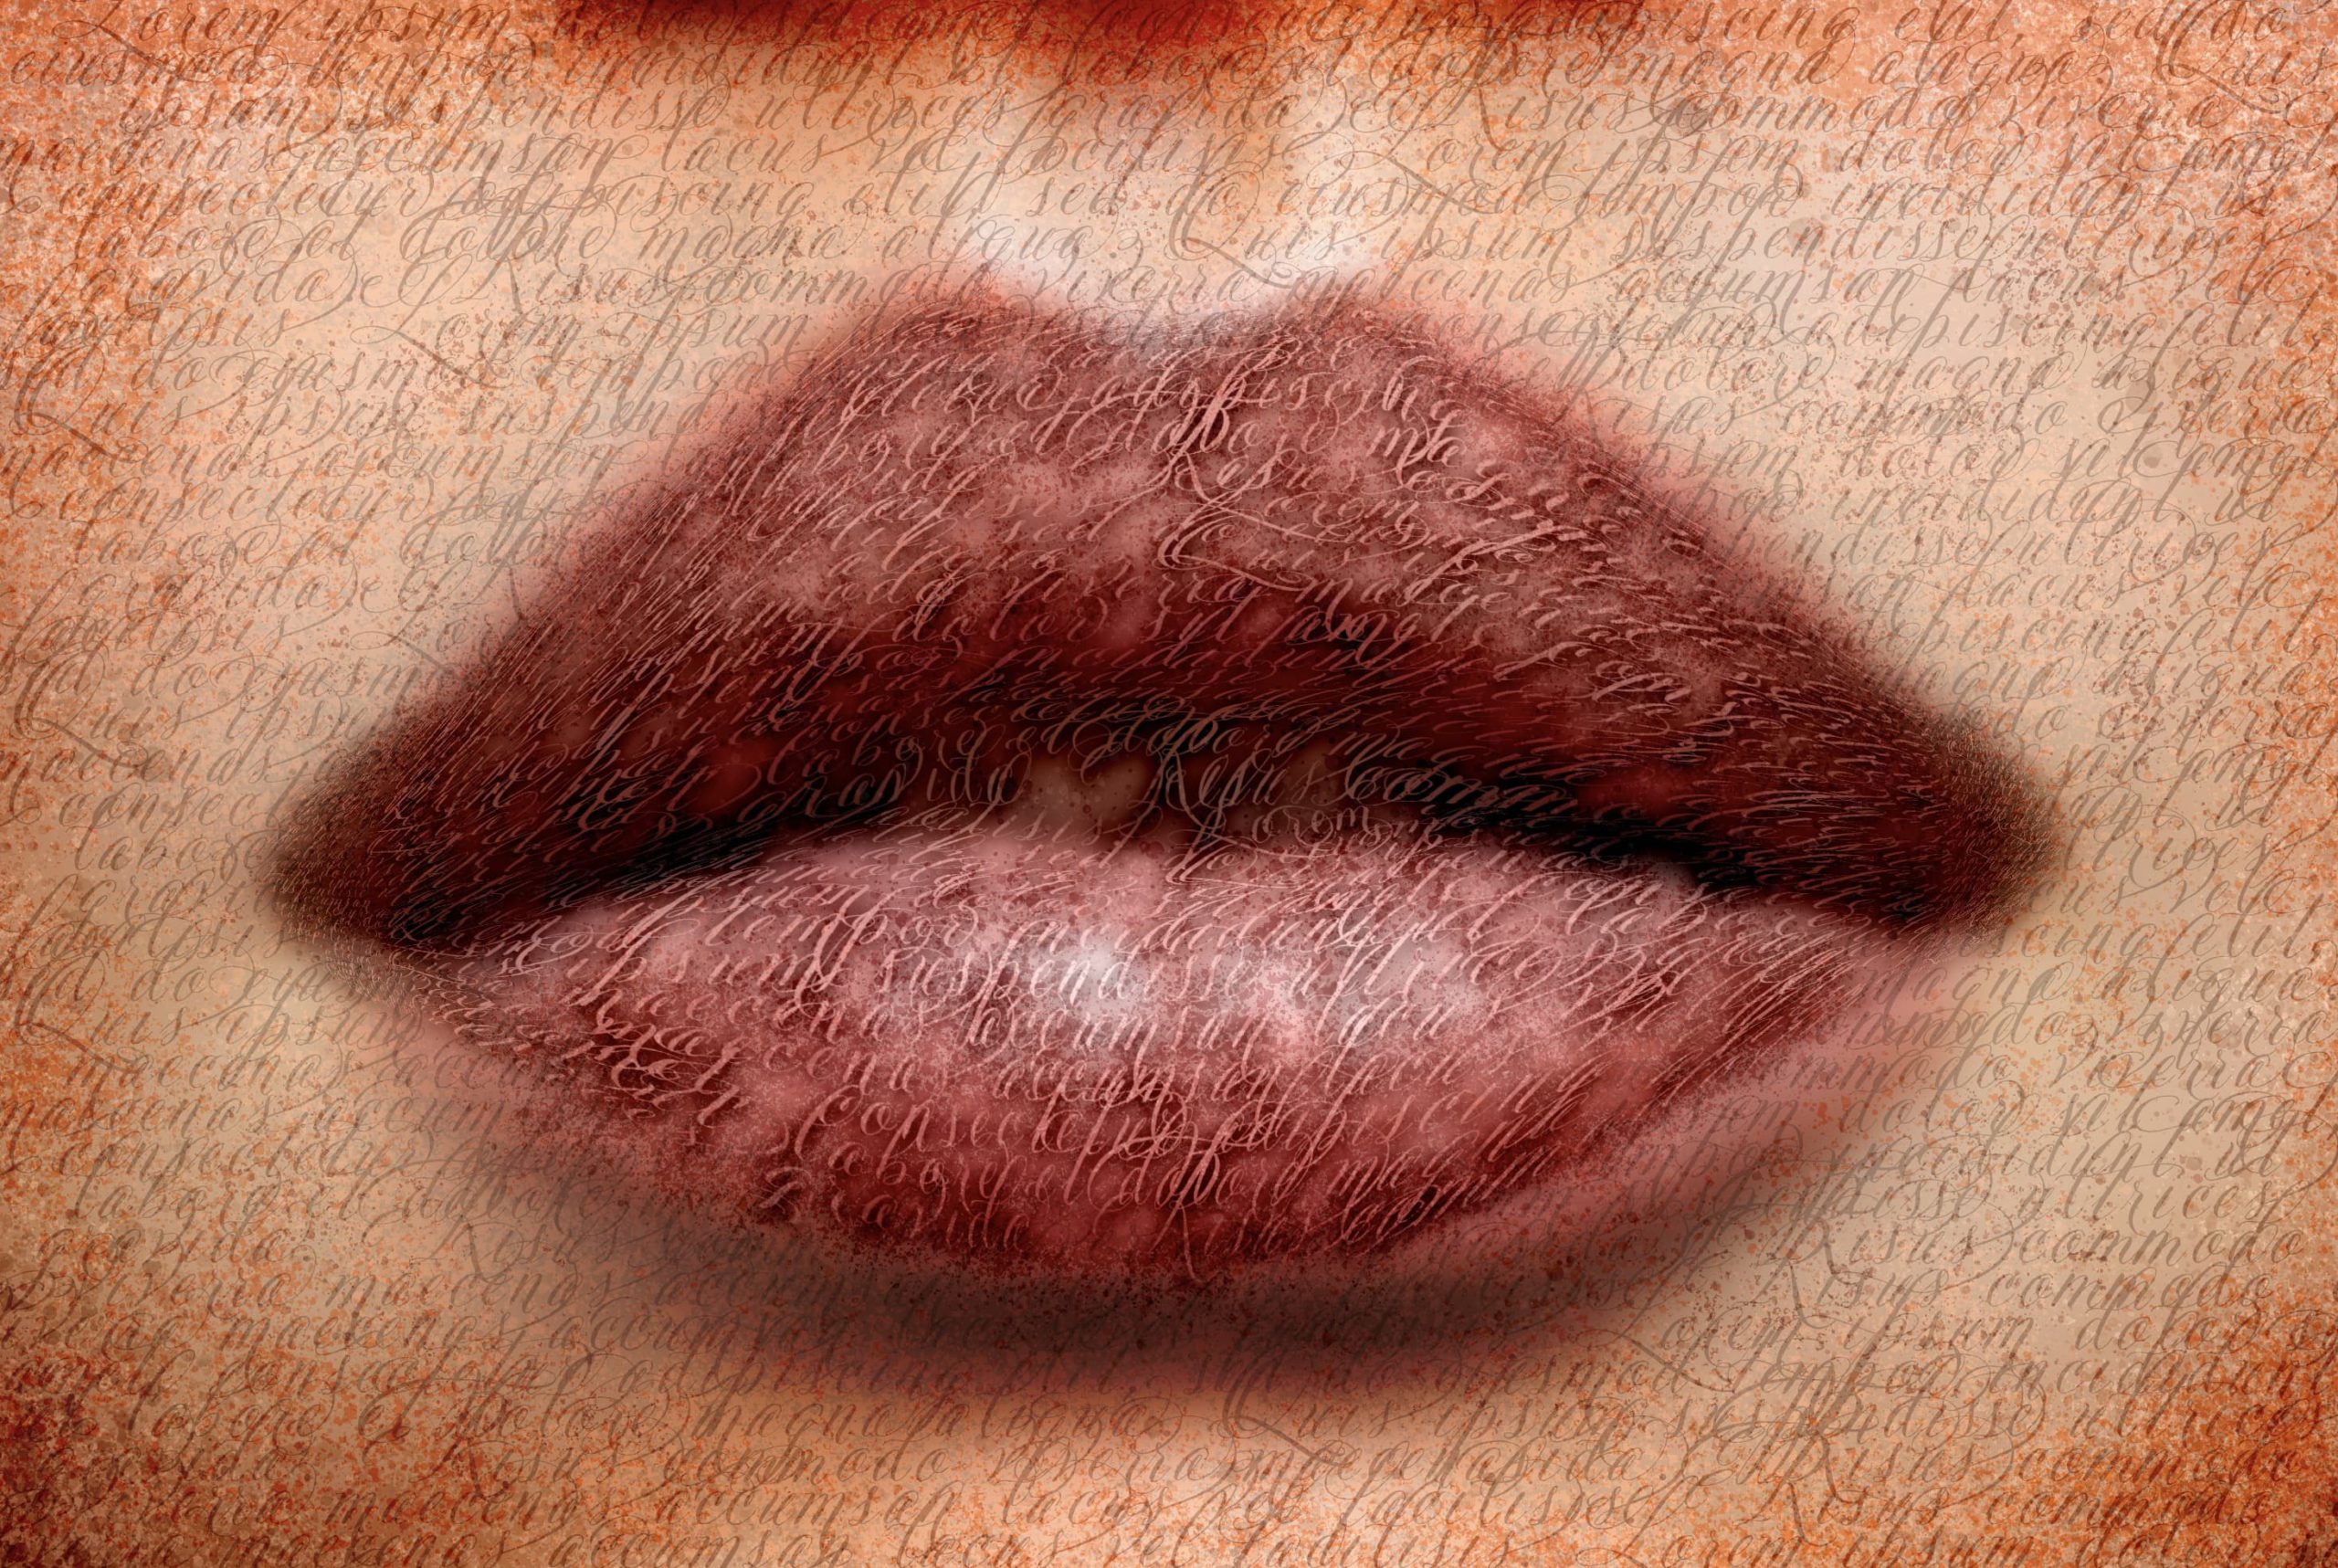
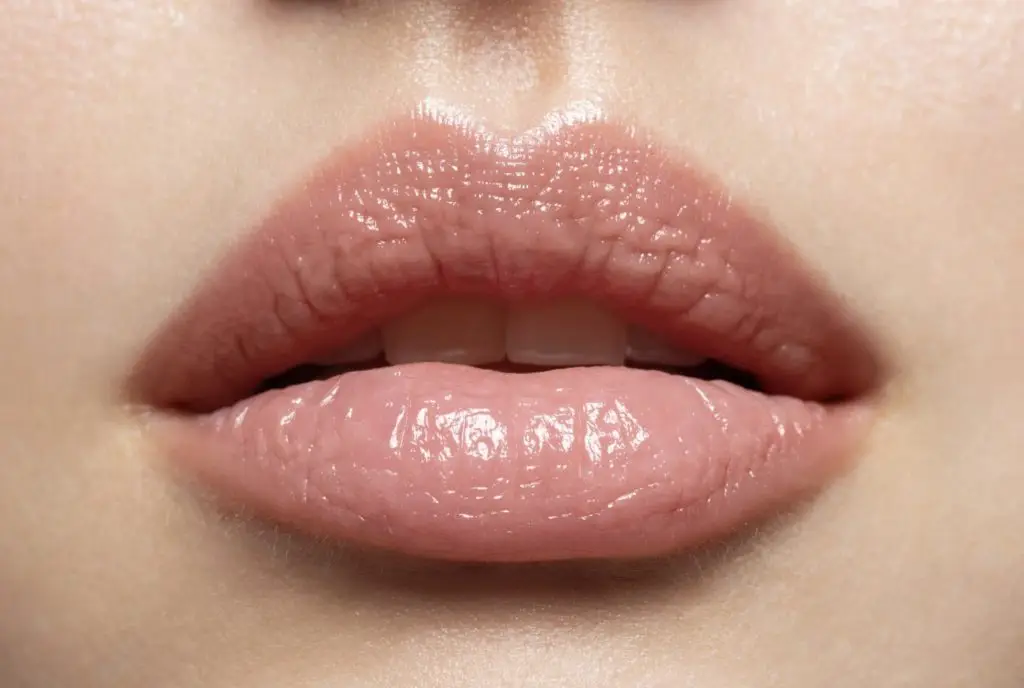
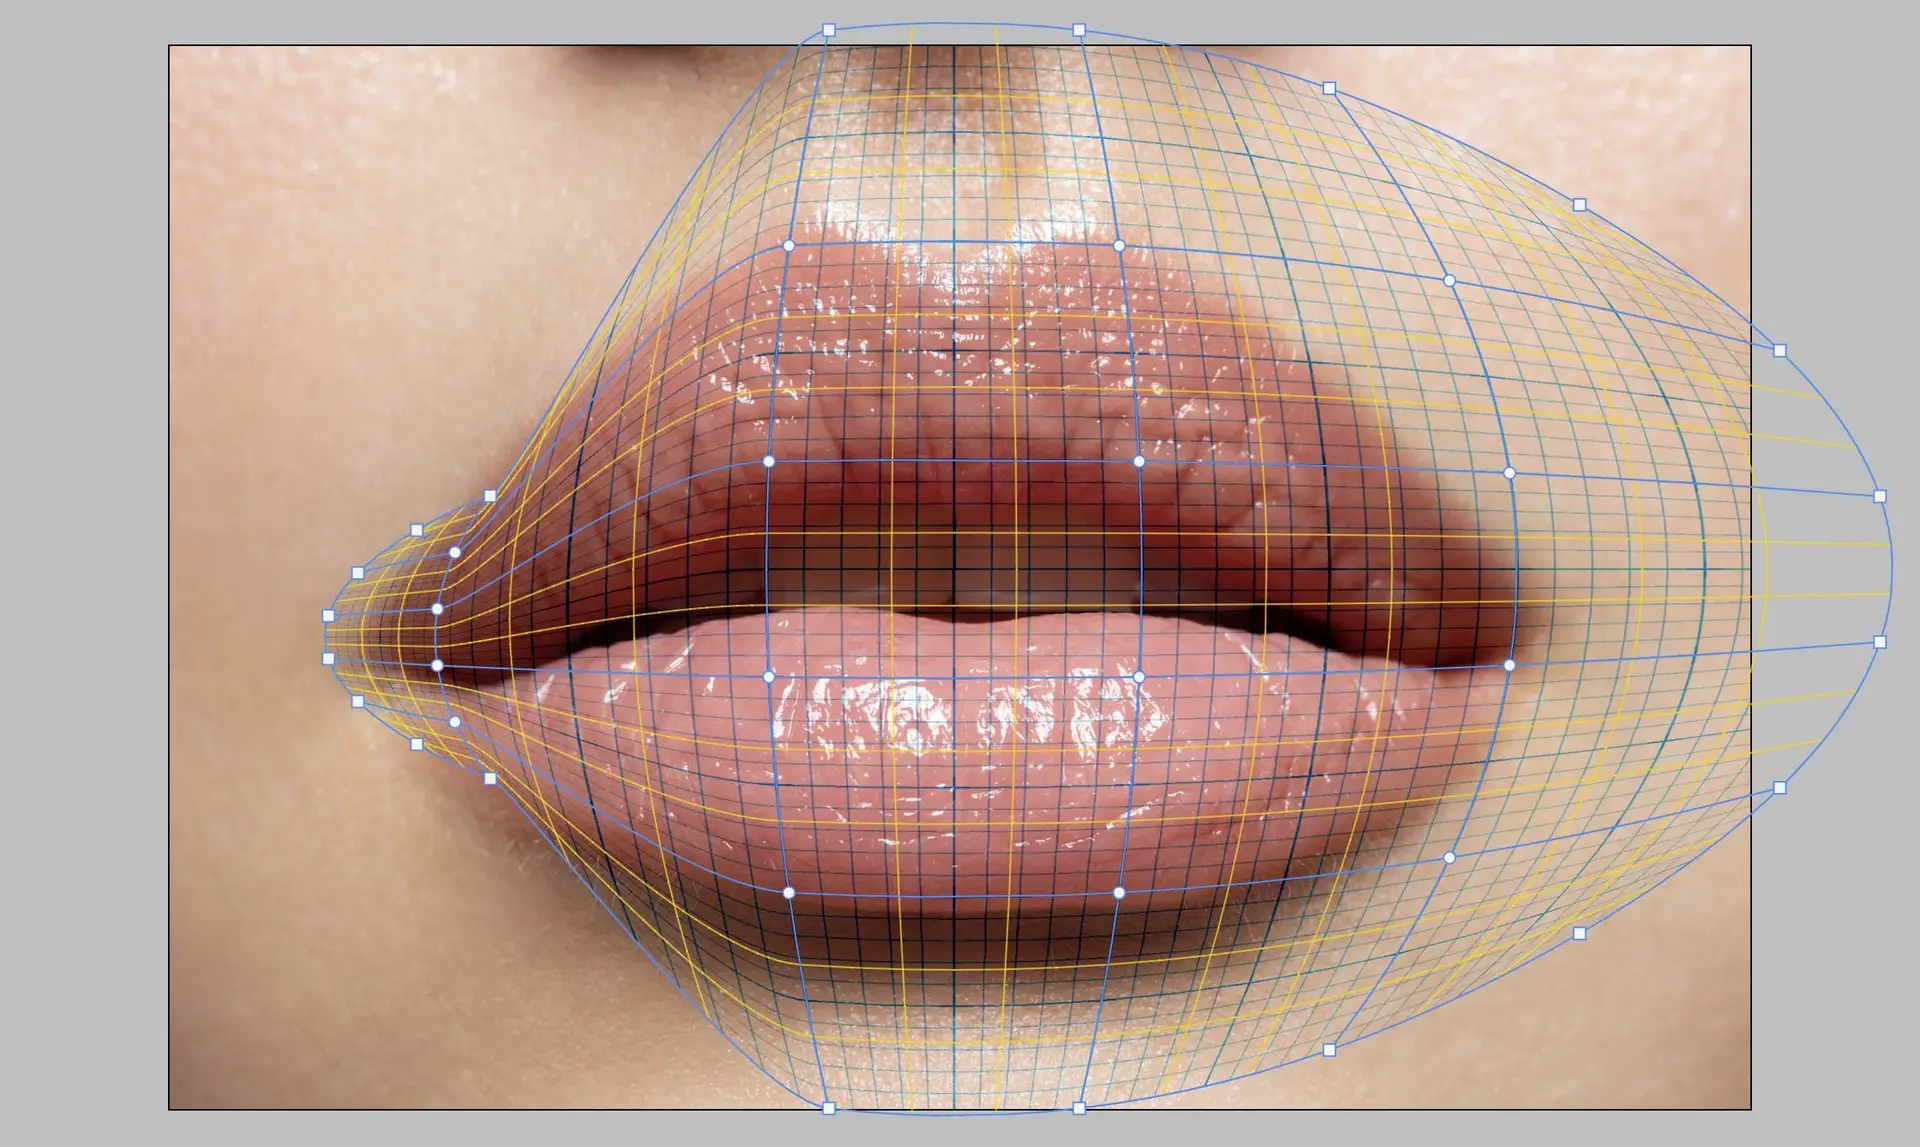
I want the type treatment to generally follow the curves of these lips, but I haven’t yet decided on what type face or other elements I want to include. I’m going to use the graph paper stock to let me pre-build my warp without the clutter of text or having to rebuild the warp every time I want to try a different type face.
Since I’m using an item from Adobe Stock, it comes in as a Cloud document which prevents applying Warp transforms. Add your stock graph paper image above your subject image, then change the blend mode of the graph paper layer to Linear Burn or any other blend mode you like that shows the grid lines over the subject.
Placing the graph over the subject as a warp guide
Scale the stock image (Cmd+T, PC: Ctrl+T) over the working area and hit Enter to accept the transform. Use Opt+Click (PC: Right Click) in the Layers panel and choose Convert for Smart Objects. This preserves the Cloud object link but allows for Smart Filters. The blending mode will be applied to the Cloud object’s layer in the Smart Object file, leaving you free to add content later.
Now comes the fun part!
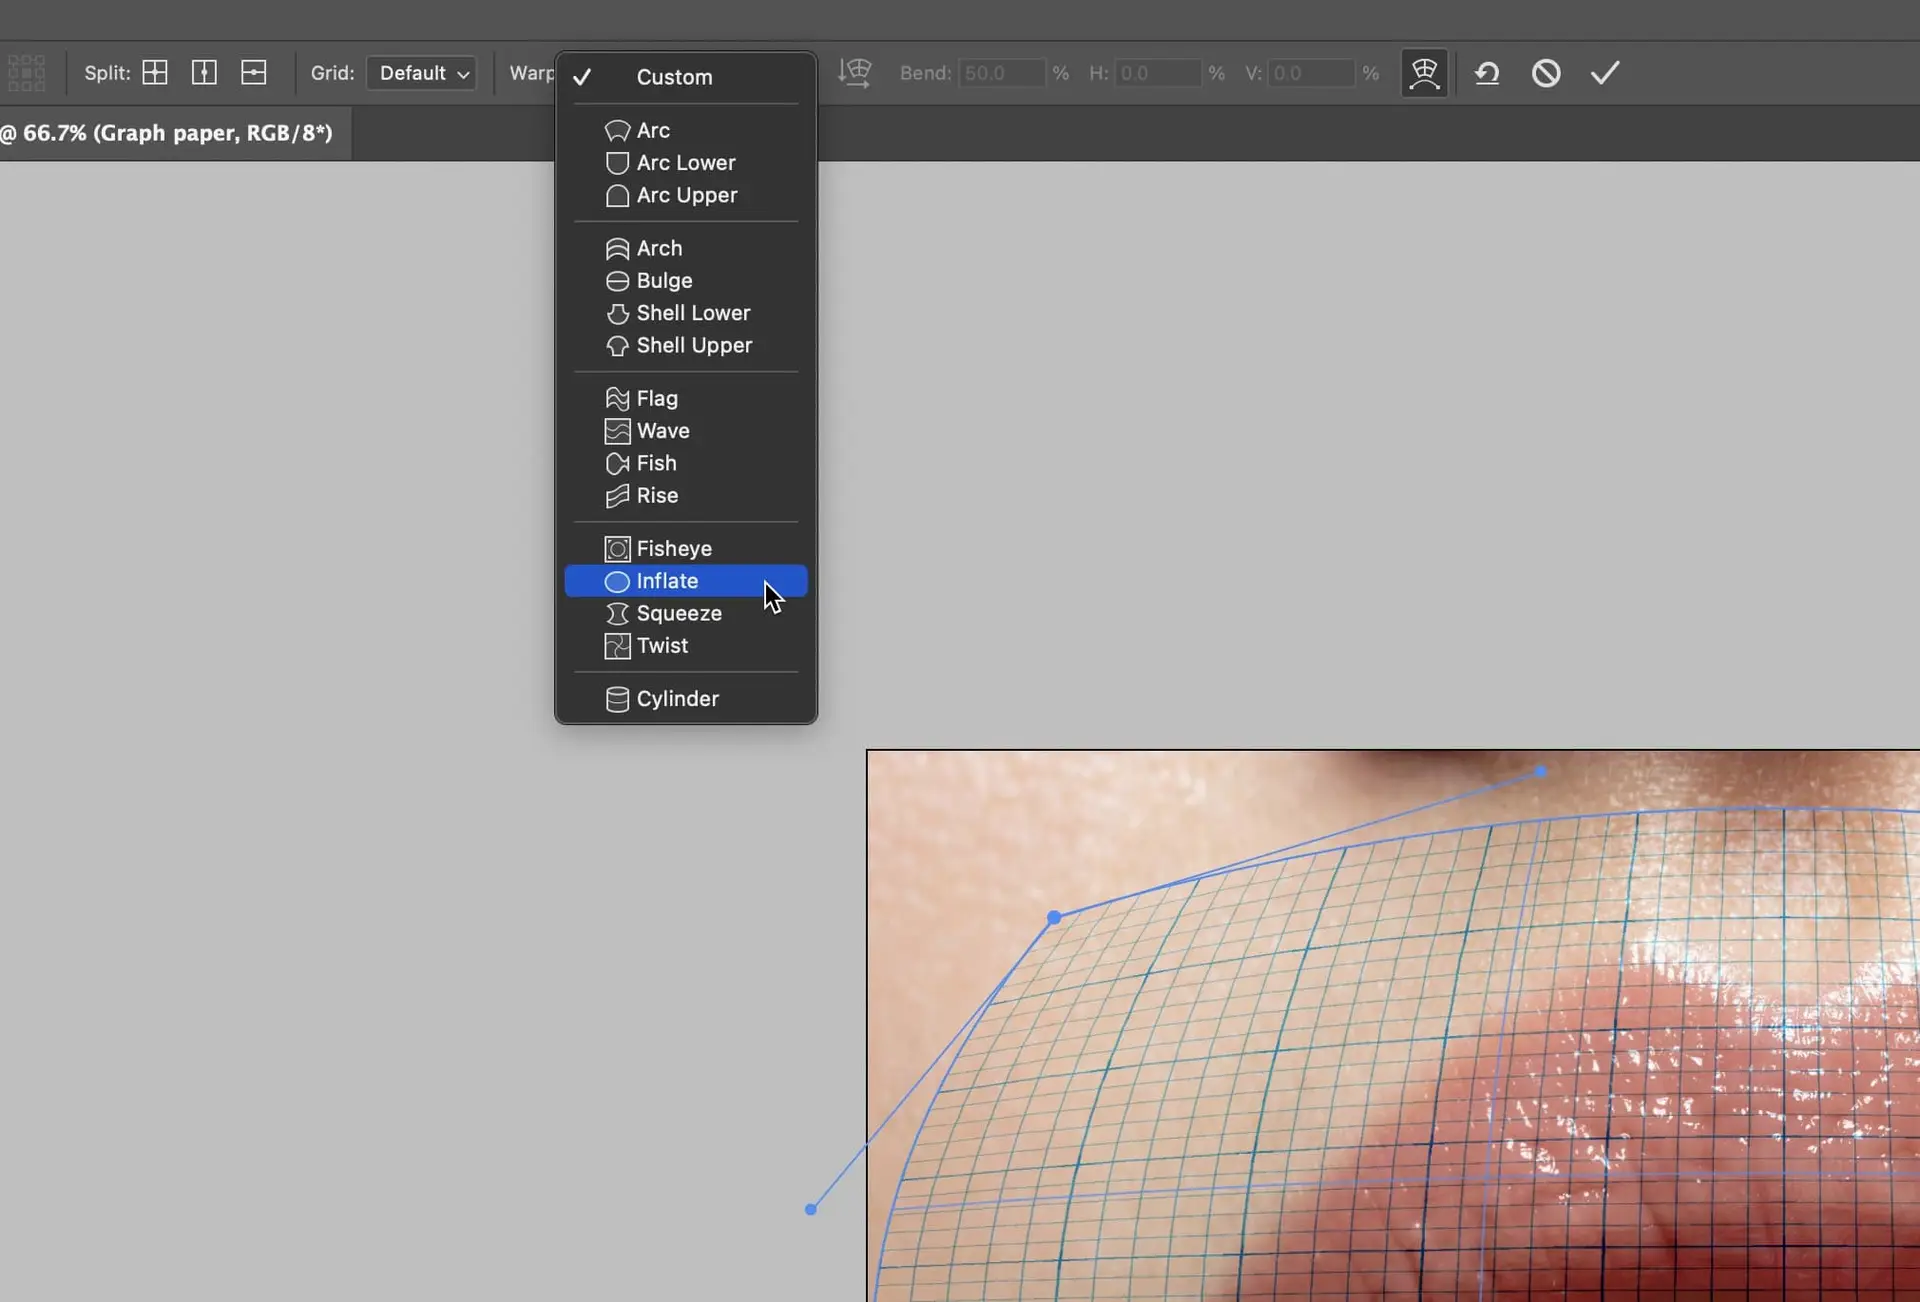
On the graph paper layer go to the Edit menu and choose Transform > Warp. You’ll get a basic warp envelope with control points on the corners. Notice the control points (nodes) are circles, and the handles end with smaller circles.
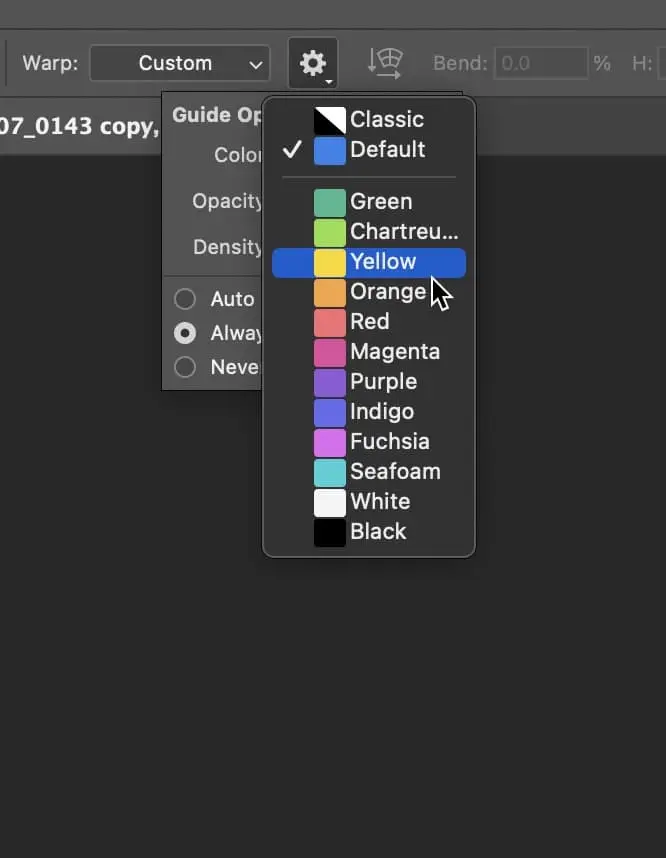
Tip: If you have trouble seeing the Warp envelope over your image, check out the top Options bar and click the Gear while Warp is active. You’ll get choices for Guide line colors, opacity, and density, as well as when to show the lines. Note that the Guide lines are different than the Grid lines – guides are visual reference for how the warp is behaving, while grids are the actual lines you can manipulate. I’ve chosen Yellow and Always Show Guides; the default is Blue.
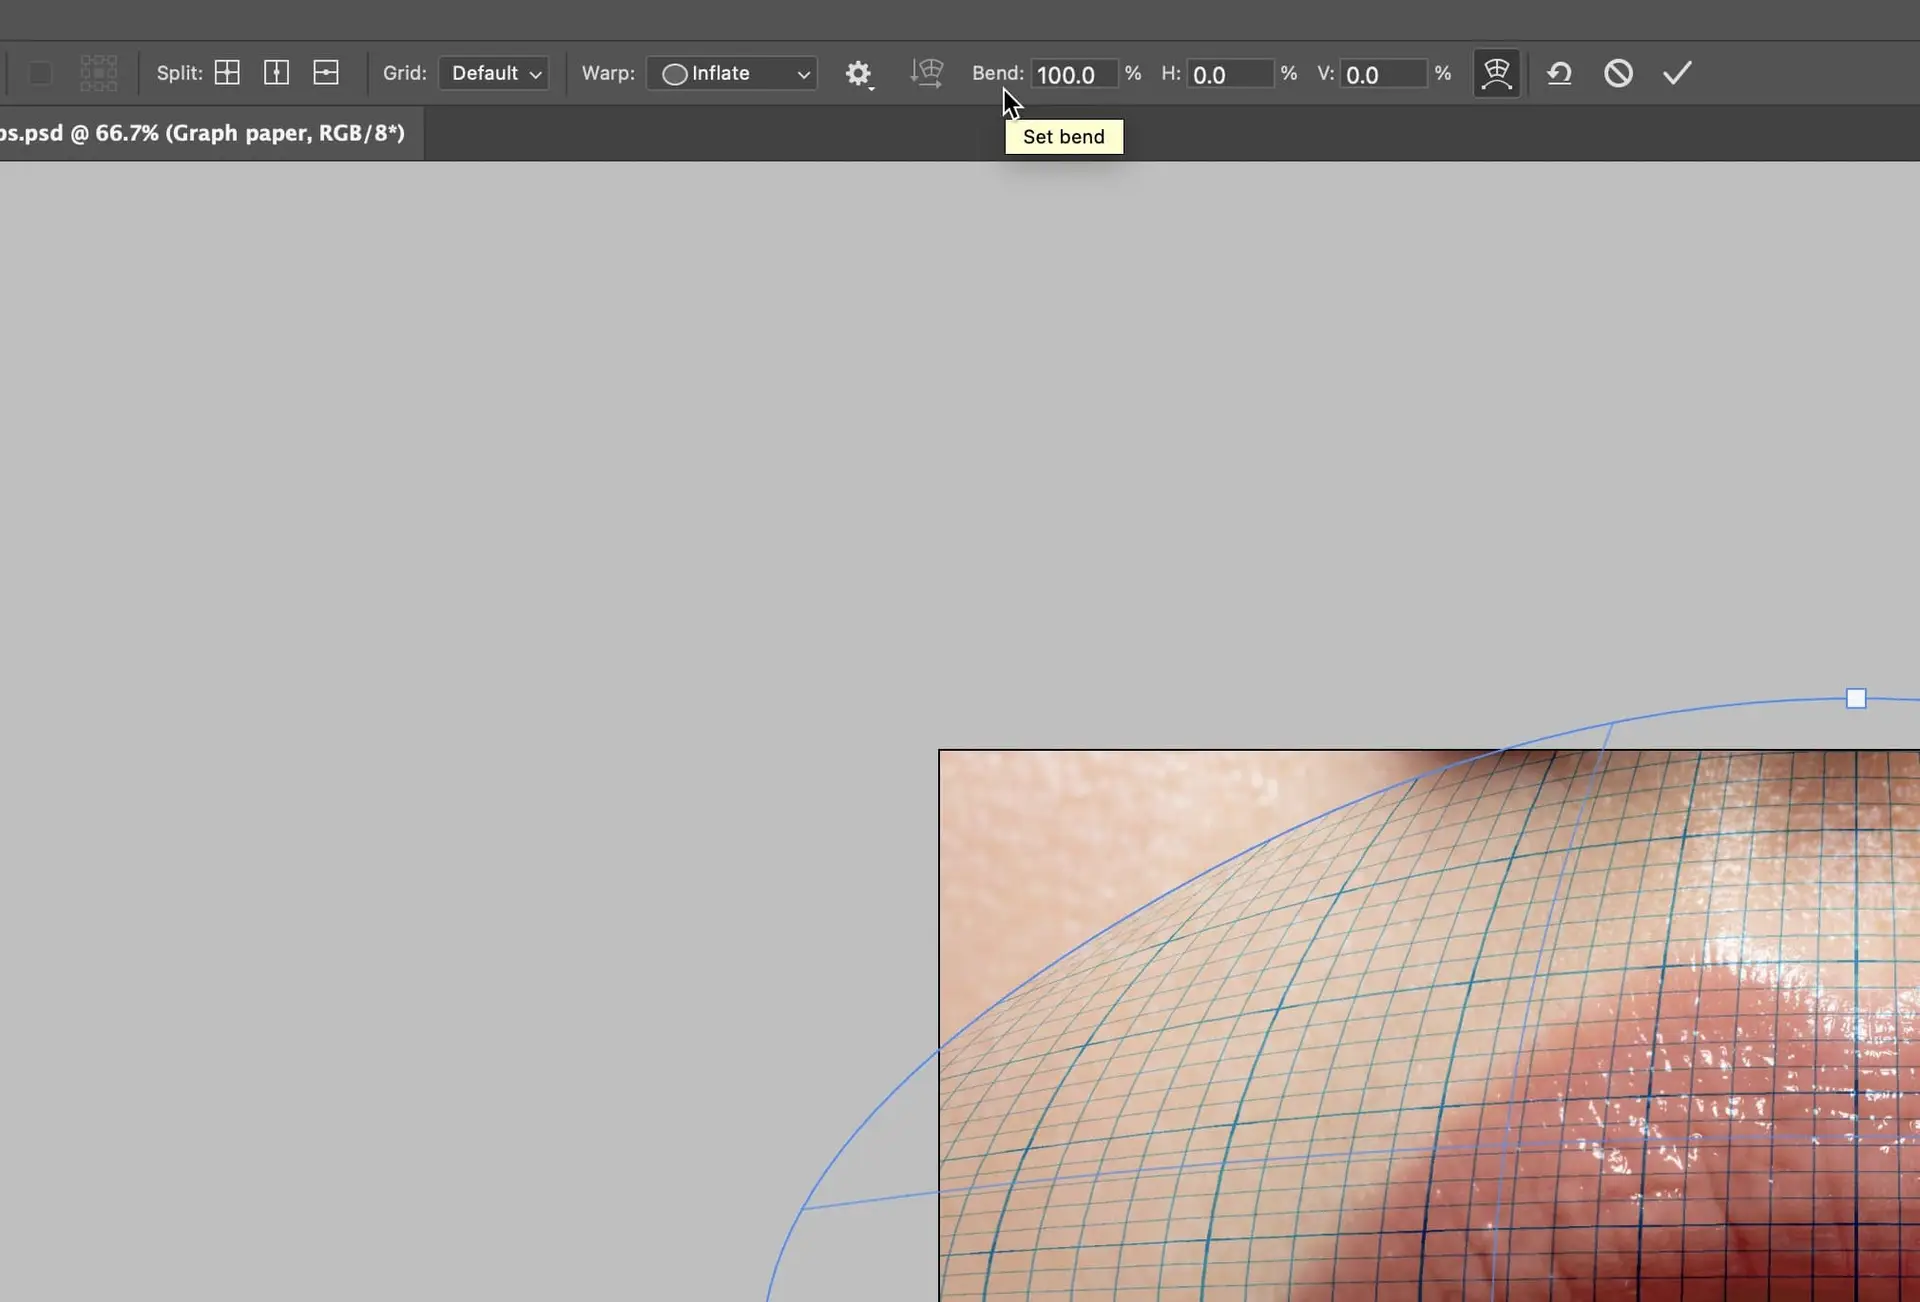
I like to make things as easy as possible on myself so I’m going to use a Warp preset from the Options bar called Inflate. This will give us a reasonable starting point and make things more even than adjusting the shape by hand. But there’s another option that takes it a step further.
Next to that menu is a box called Bend. Setting that to 100% gives me the maximum roundness and is a reasonable approximation of the shape of the mouth.
Notice the difference? The corners are gone and our work is much simpler!
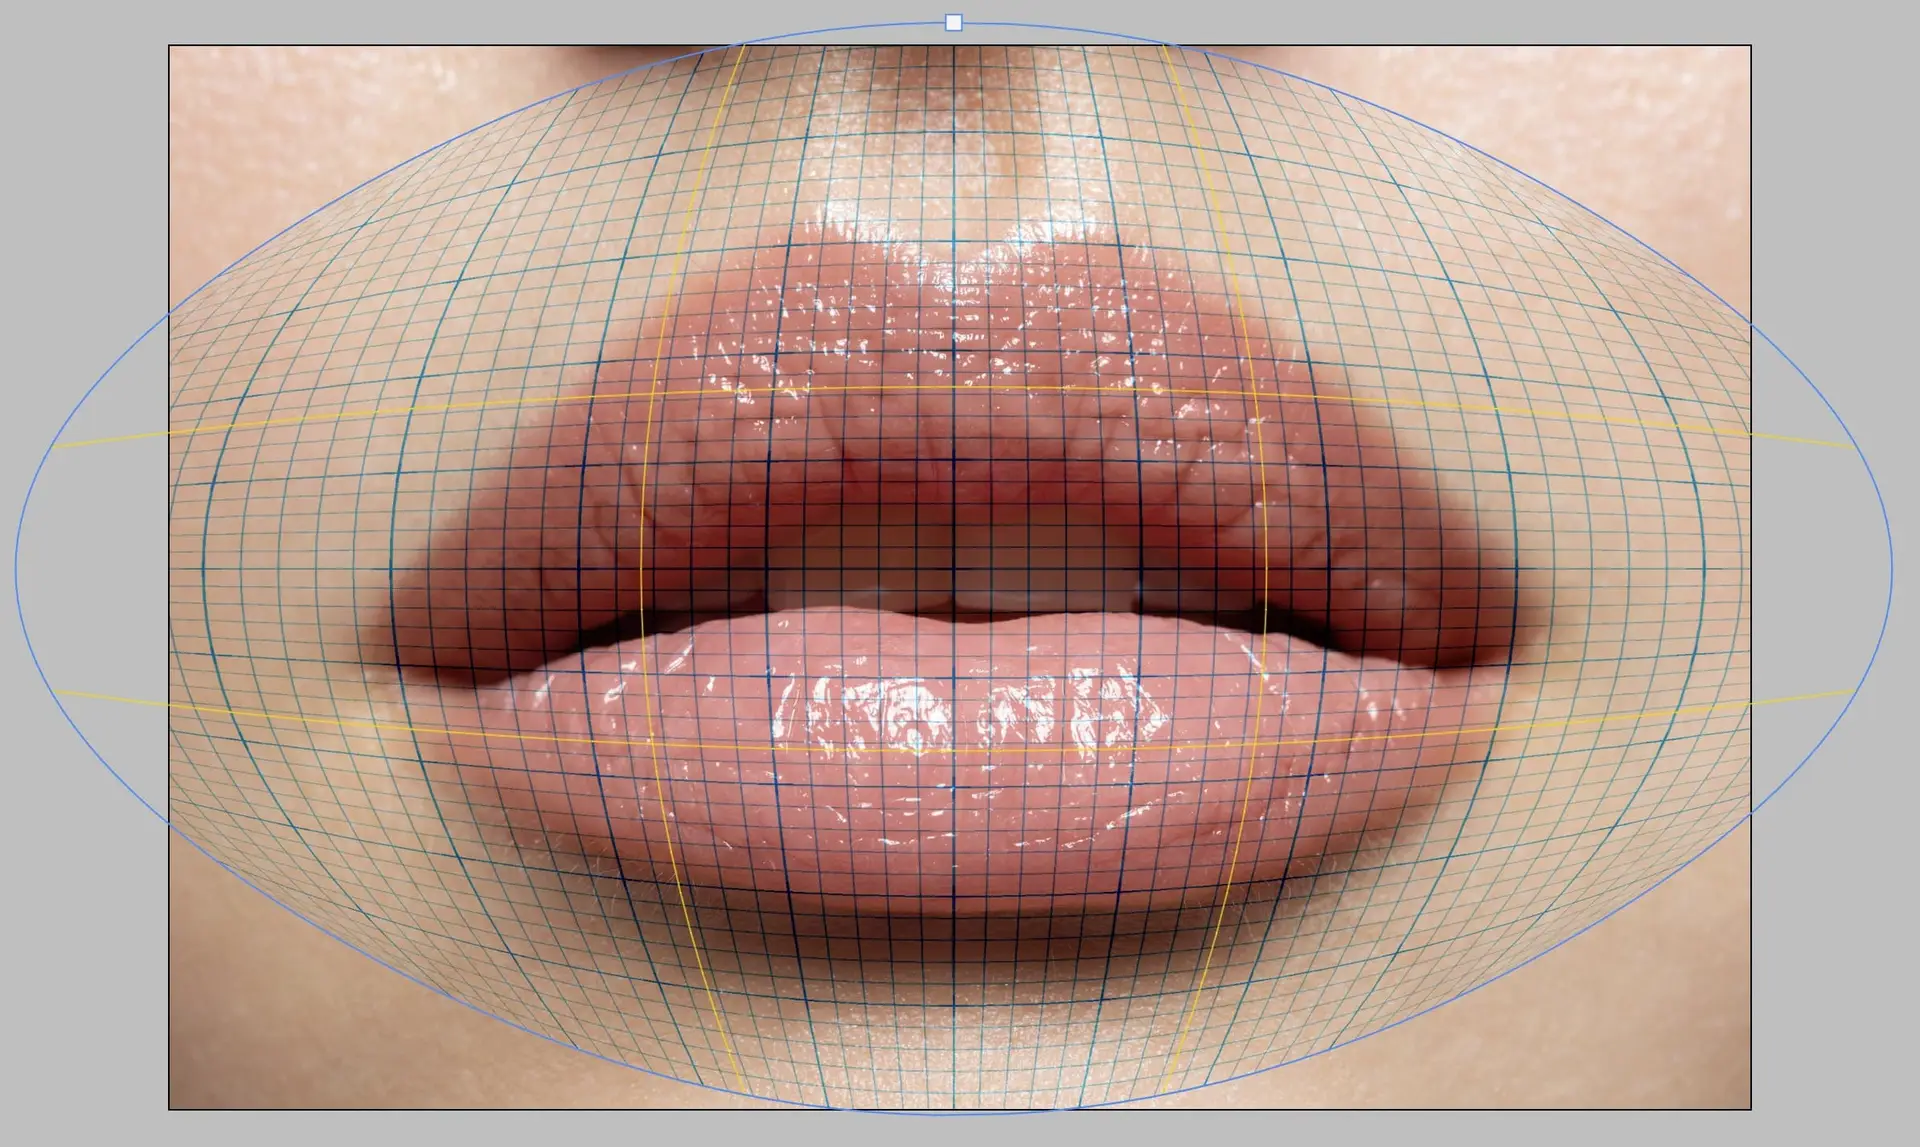
Also from the Options bar choose the 5×5 Grid size and take note of the control points. The corners are now white squares, and there are lots of nodes throughout the entire warp envelope. This is now a Split Warp, and it gives you lots of additional control.
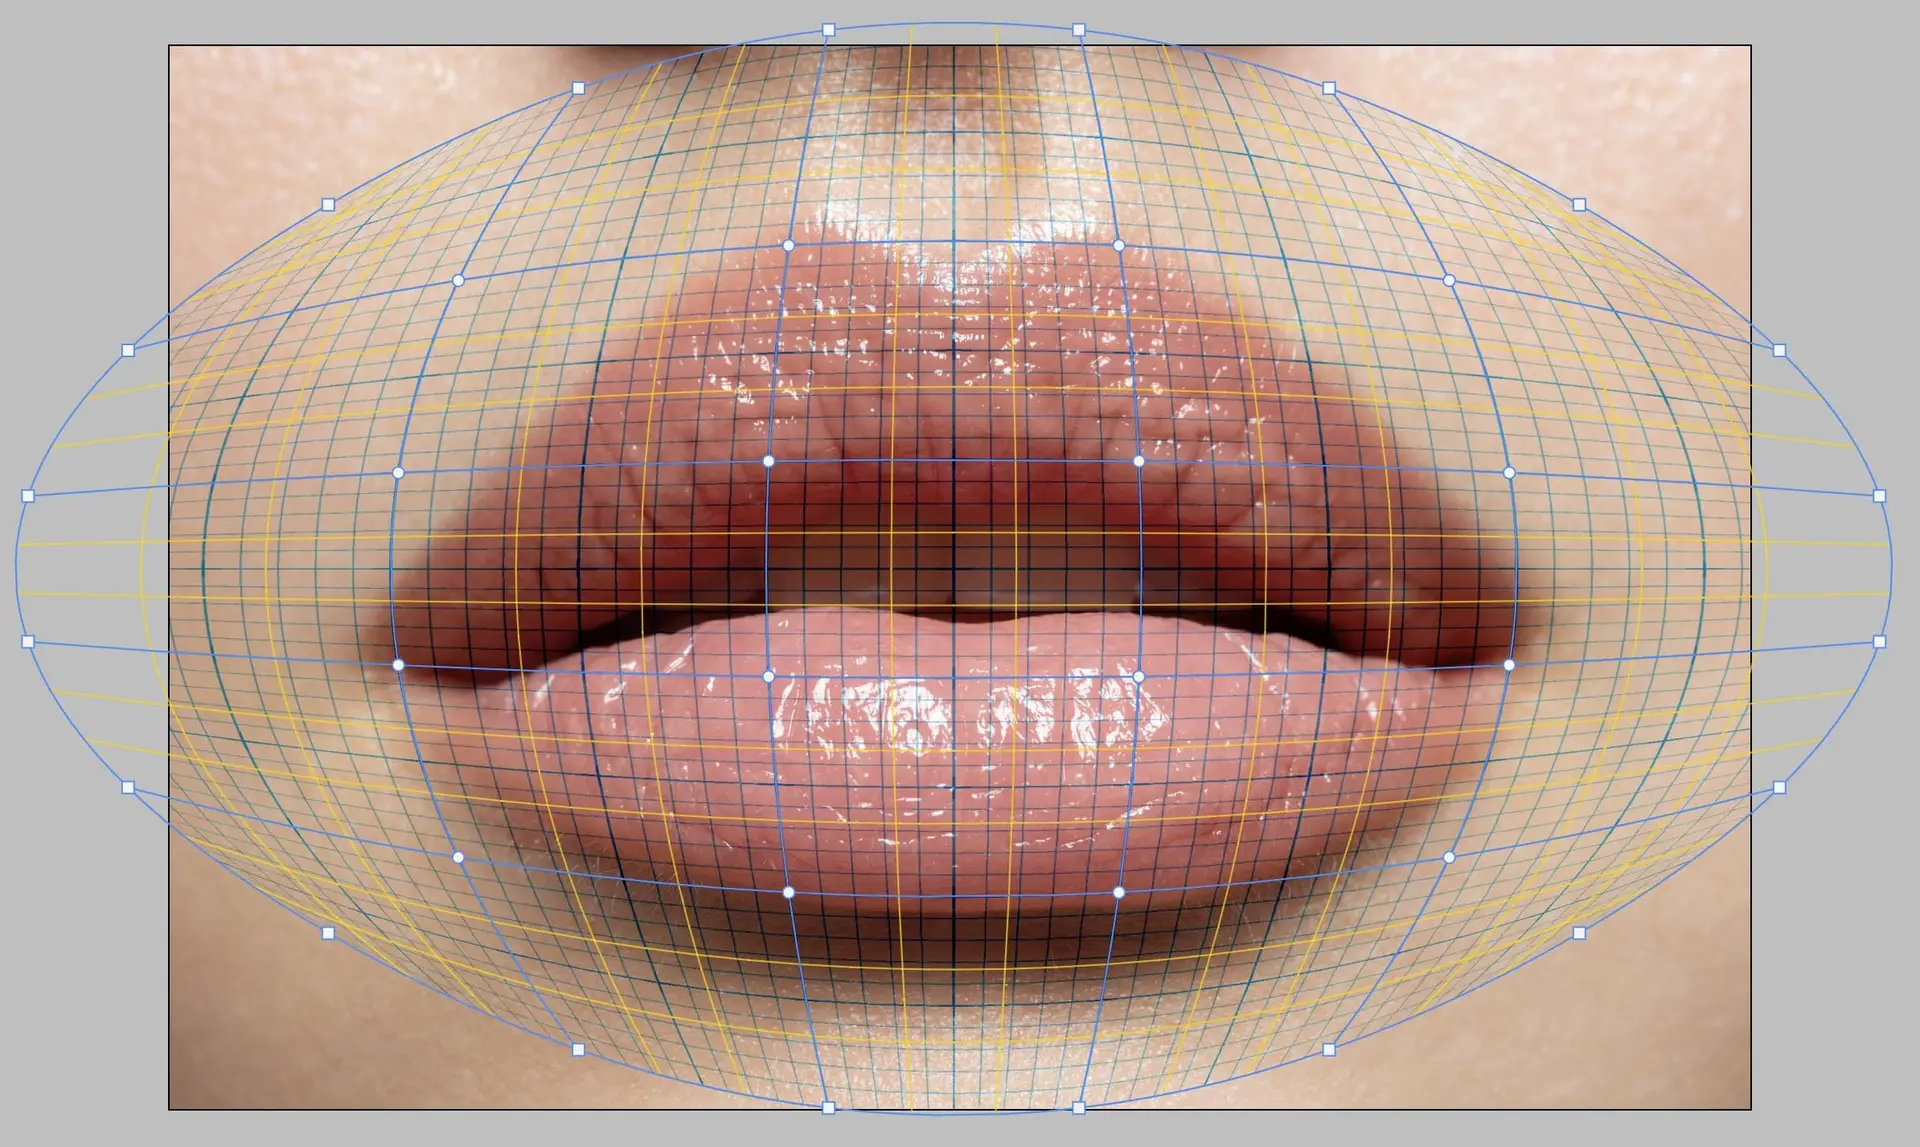
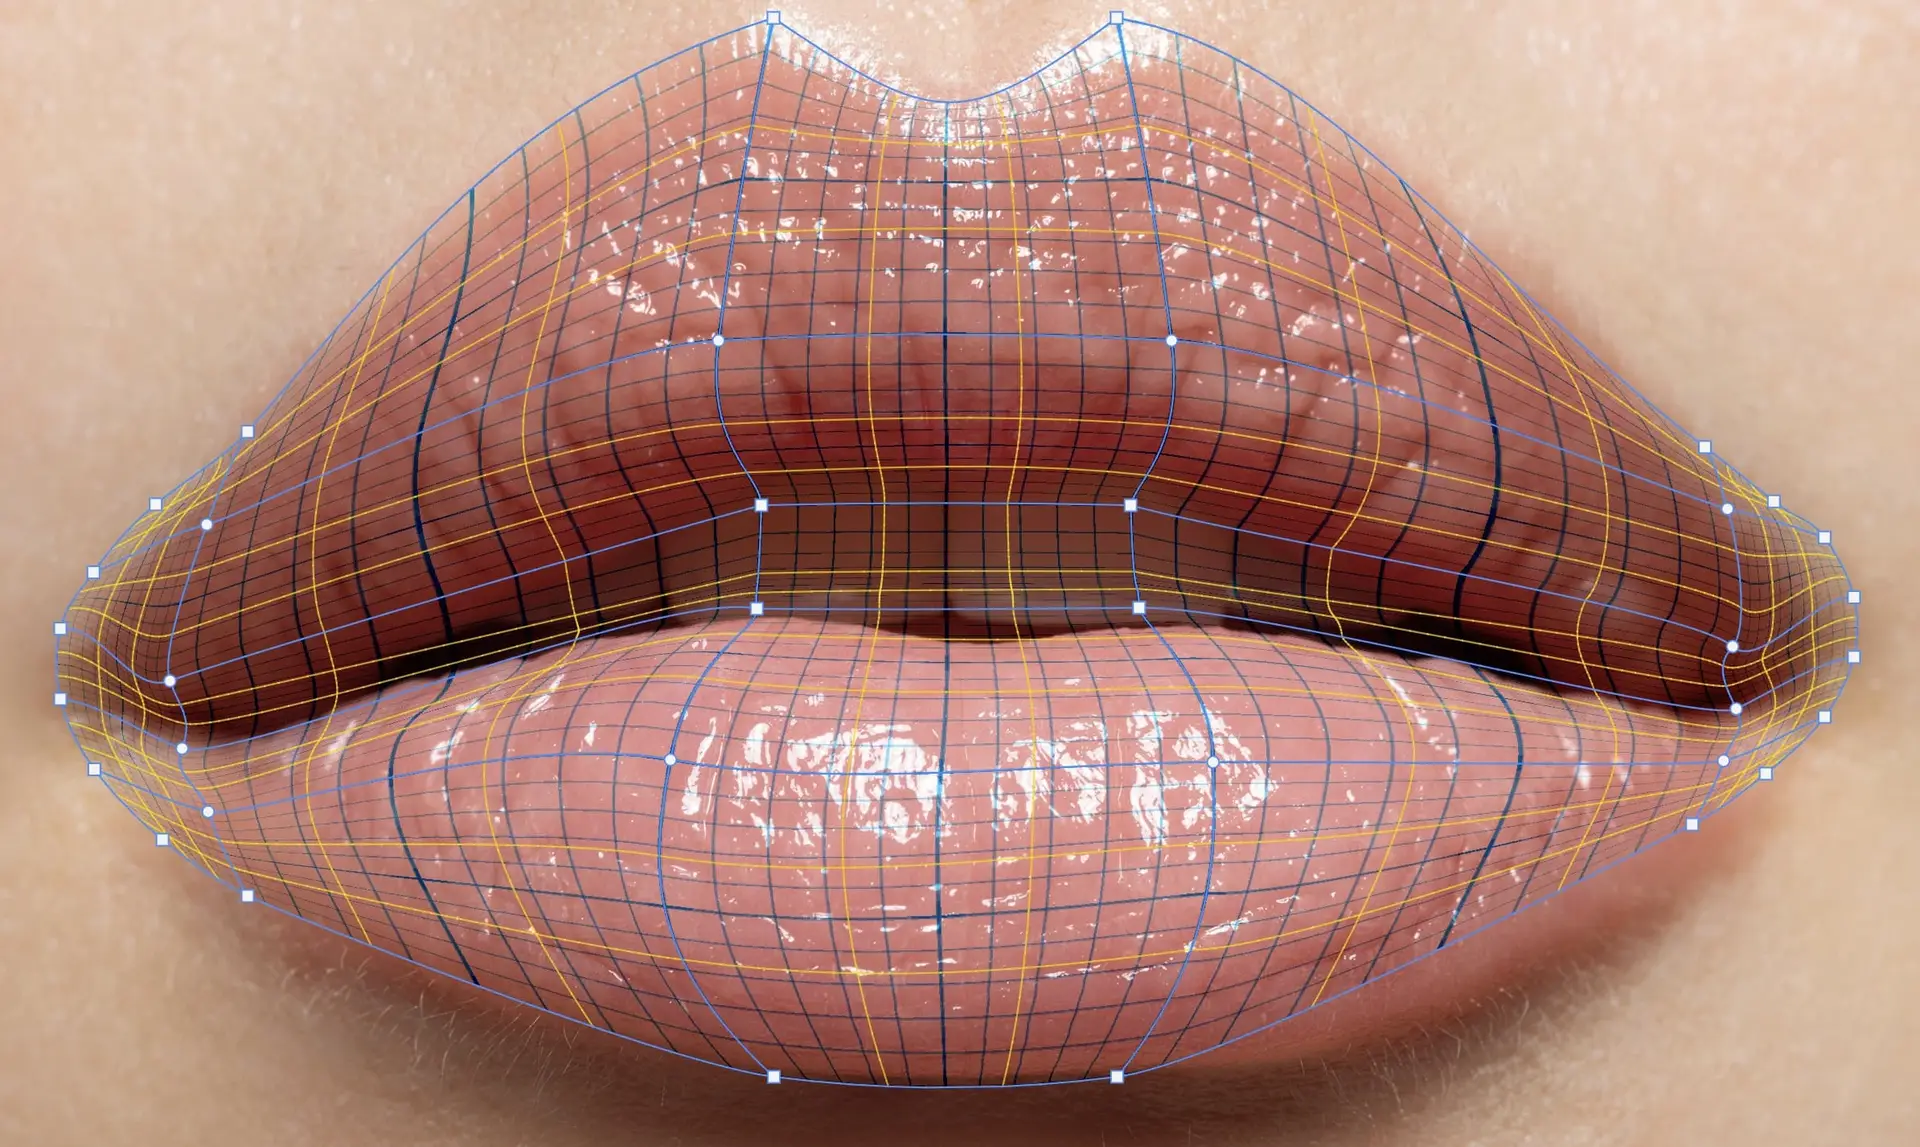
Hold down Shift and drag over the left two grid lines. The selected nodes will turn blue and there will be a box around them. Release the Shift key.
VERY IMPORTANT! Do NOT press Enter or Return while you are working or it commits the transform and you’ll have to open it up again by going back through the menu option. It’s not a disaster, but it’s enough of a pain that you’ll want to avoid it.
Move your cursor to the outer left corner and find the spot where the cursor changes to a double-headed arrow at a 45-degree angle. Drag down to the right to scale the selected nodes. Release the mouse button or lift your pen, then click in the middle of the selection and drag the area into place at the corner of the mouth.
Deselect the nodes by clicking somewhere in the Warp envelope – if you click outside the mesh, you’re likely to commit the warp and have to get back into the tool.
Repeat the process for the right side of the mouth.
You can use this Scale trick for any selected nodes, even if they’re not next to each other. Hold Shift and click on the nodes you want to move, then scale and move the bounding box as needed. Click away from the box to accept those changes without closing Warp. You can scale in all directions at once, or just horizontal or vertical. Watch for the cursor to change directions to tell you the current setting.
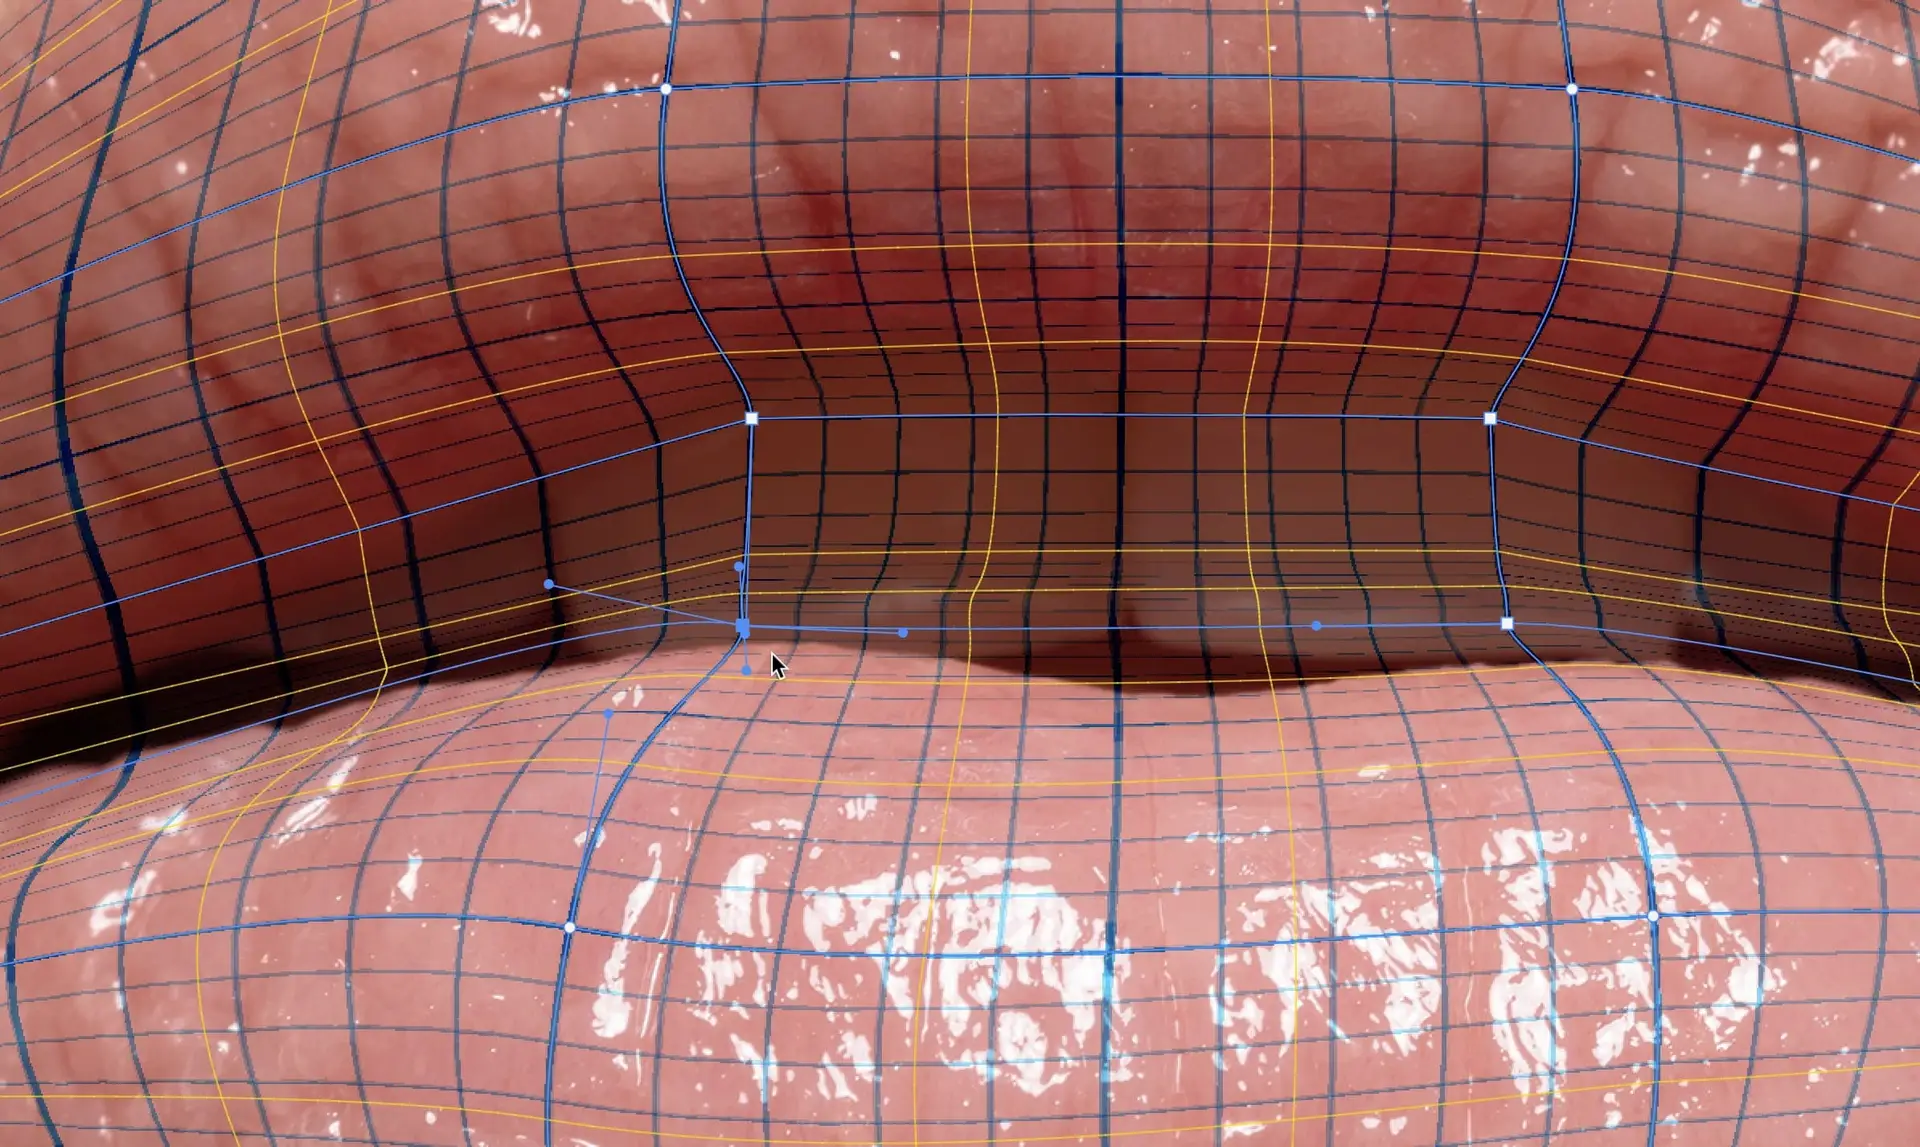
After moving several groups around, I’ve got a good approximation of the final shape. To refine from here requires moving individual nodes around, including rotating them by moving the control handles. By default, each node’s handles move in Unison mode. When the node is a circle, all of the handles move together when rotating. To move the handles individually (Independent mode), hold Opt (PC: Alt) and click on a node to convert it – it becomes a square.
Pro tip: If you convert to Independent mode and adjust a handle, changing back to Unison mode snaps the handle back to its original orientation and takes the warp with it. Try rotating the node as much as you can in Unison mode, then switch to Independent for final adjustments.
Just like with Bezier handles you can change the length of each control individually to control. There are additional features, such as holding Opt (PC:Alt) to add a new node (called “Splitting” the warp), or selecting a node and pressing Delete to remove it. And just like with regular Warp, you can drag within the envelope to move regions, you can drag a segment connecting two nodes, and you can rotate multiple nodes around the center of the selection.
For now concentrate on getting the bulge and surface curves right by carefully moving and rotating the nodes. The final grid should reasonably follow the natural contours of the lips.
Press Enter to commit the warp, and get ready to load up the Smart Object with your favorite texture!
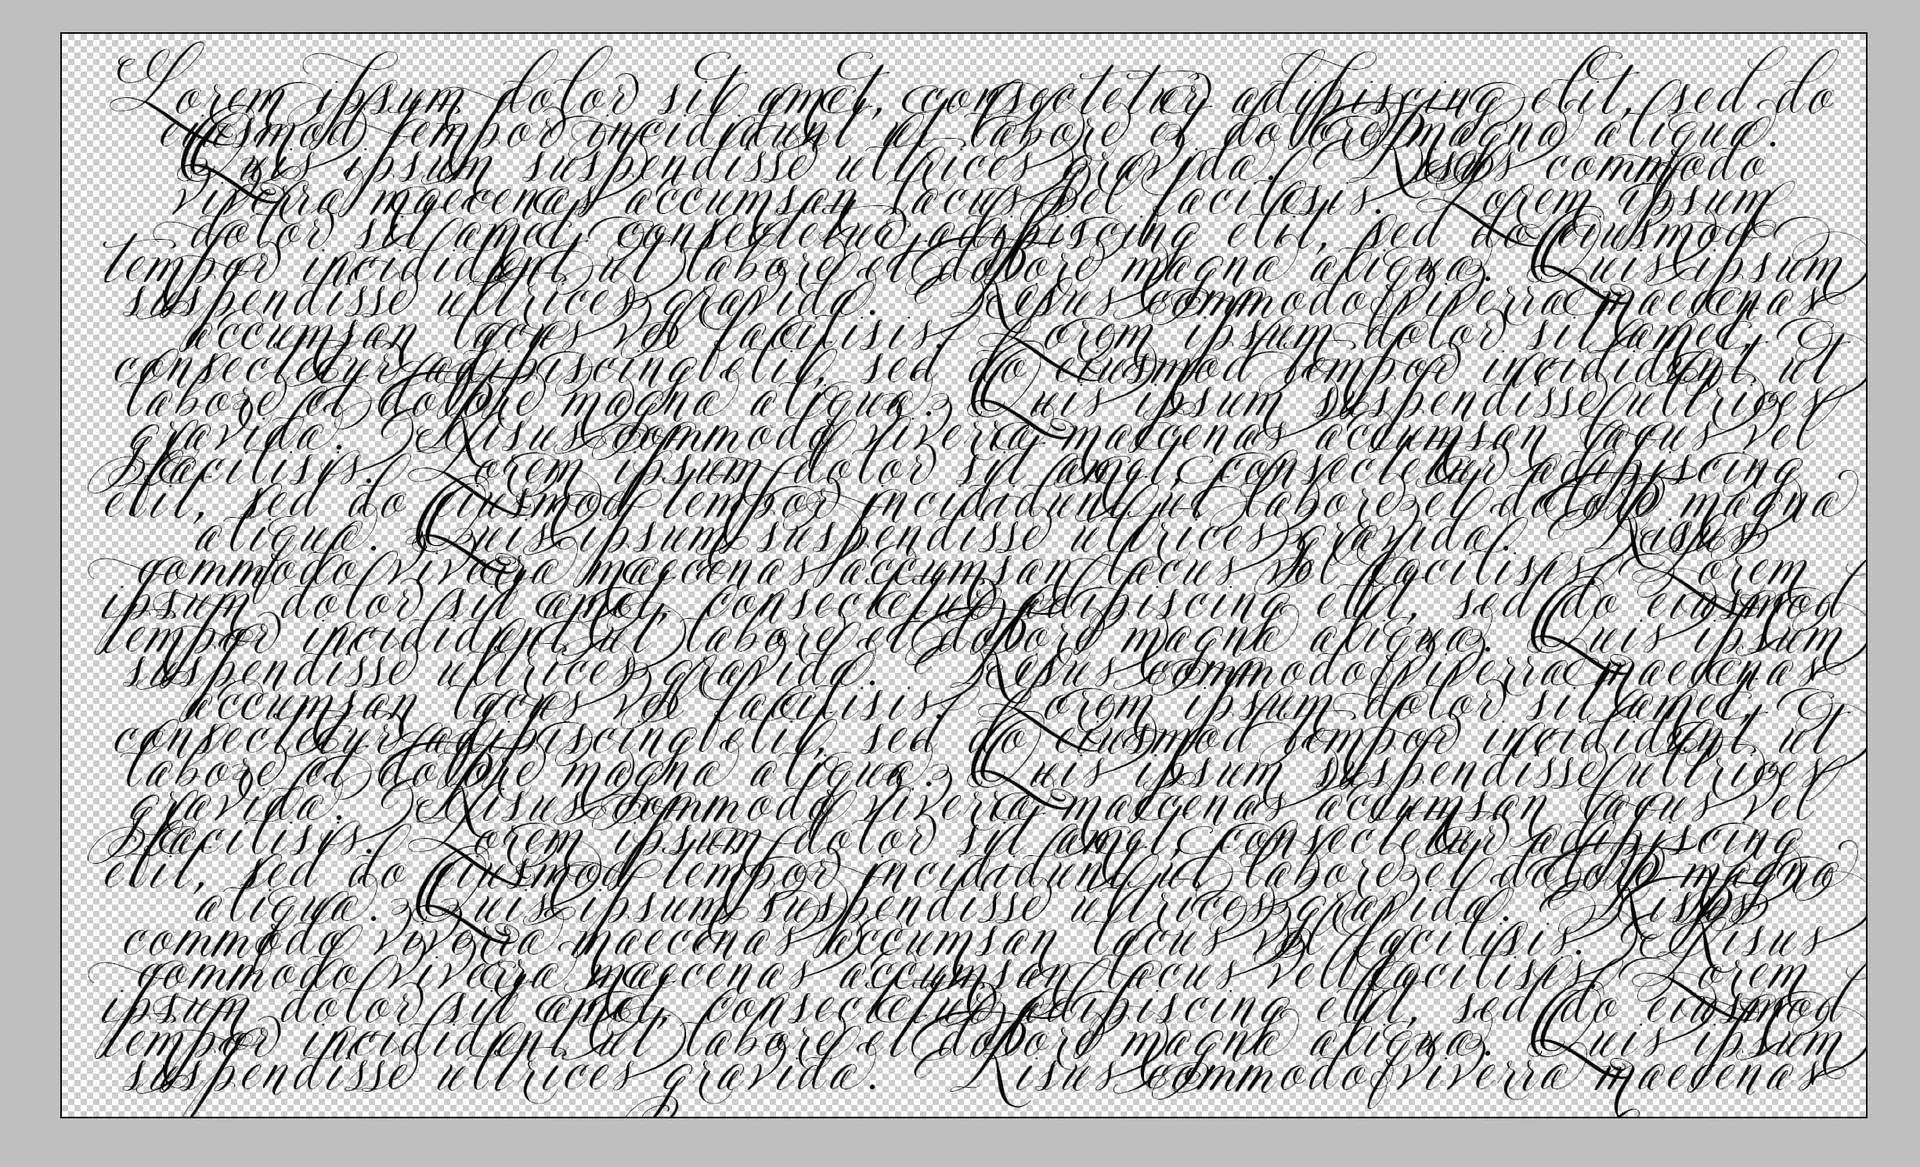
Double-click on the graph paper SO to open it, then add a Text layer above the paper layer. Because the warped SO completely matches the subject, we’ll want to make sure that the text fills everything in the layer. I’m using a font called Belluccia Pro, and I’ve set the leading (vertical spacing between lines) so that each line overlaps. The text is just Lorem Ipsum copied and pasted to fill the frame. In this example, the SO is about 2100px by 1355px, and the font size is about 87.
Save the SO (but don’t close it, yet) and switch back to your working document to see the results. From here, add a layer mask to clean up the edges and adjust the blending mode if you like.
Of course you’re not limited to text. This technique can be used for applying other patterns or even correcting textures for photorealism.
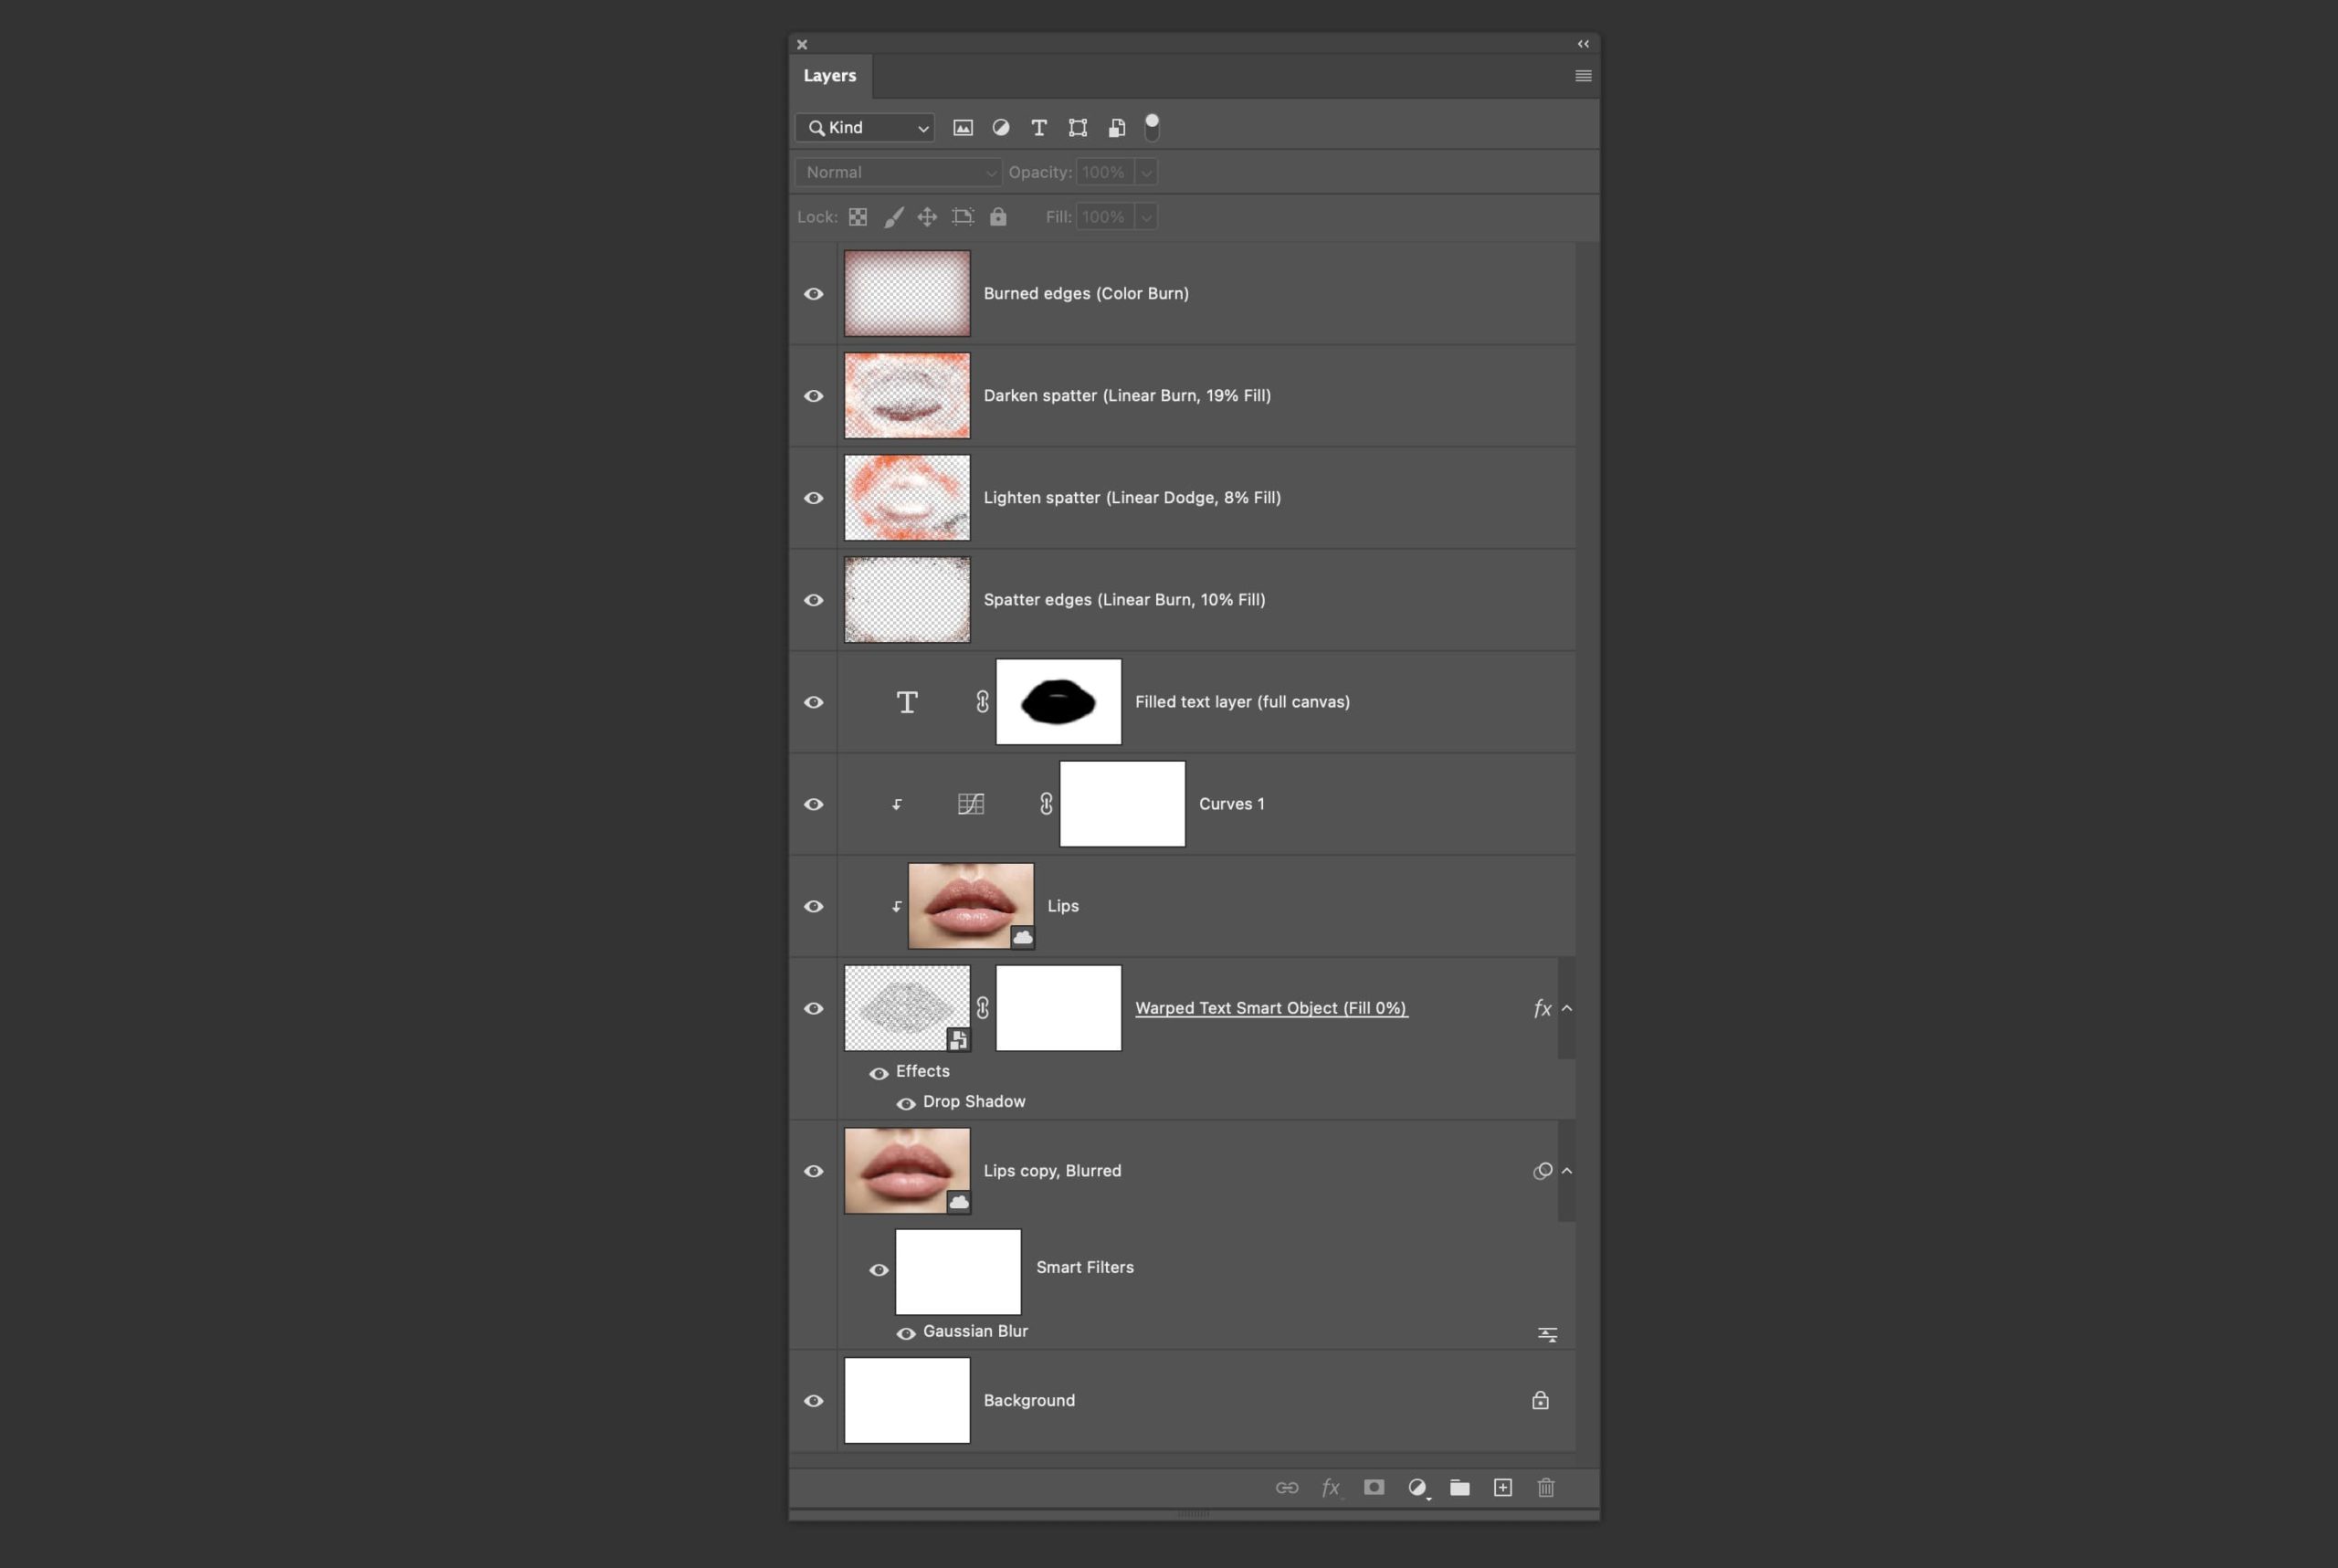
For those of you interested in the layer stack showing the warp smart object, masking for text, and the final adjustment layers for the lead image.
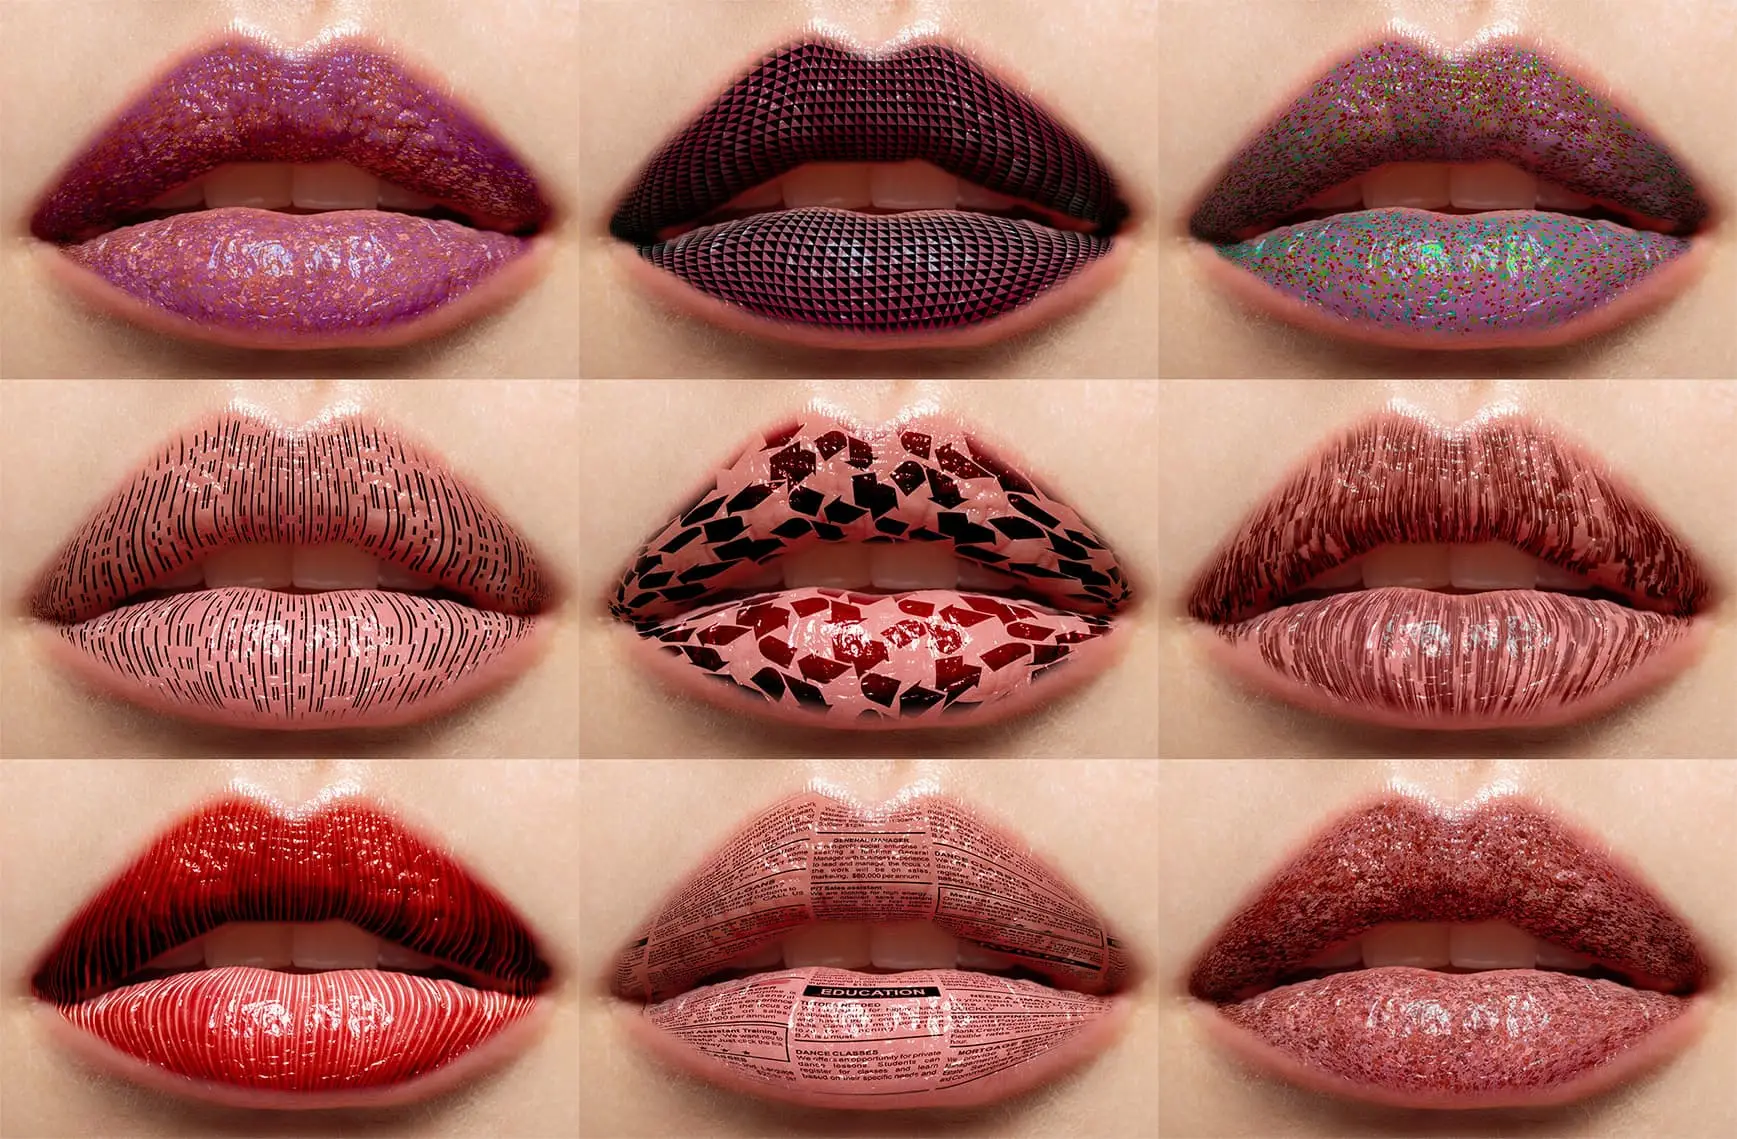
This stack lets you easily swap out the texture for just about anything you like, and the smart object warp will be applied exactly the same way. Here’s a sample showing nine variations that were as simple as dropping in a new texture in the base smart object!